 By
By How to Plan a Half-Day Walking Route Through the Luoyang Grottoes Longmen Site
Can you actually cover the main carvings at Luoyang’s Longmen Grottoes in half a day without doubling back across the river three times? Yes, but only if you walk the site in the right order. Most independent travelers lose 45 minutes to an hour simply because they cross the river at the wrong point, or they backtrack to a viewpoint they skipped earlier. The Luoyang Grottoes Longmen site is split by a river into two hillsides — West Hill and East Hill — and the walking distance between entrances is long enough that a wrong turn costs real time, not just a few extra steps.
This guide breaks the visit into a bank-by-bank sequence, gives a realistic time budget for a half-day window, and flags the mistakes that eat up the most minutes. It’s written for travelers building a self-guided Luoyang itinerary who have roughly four to five hours on site, not a full day.
Understanding the Site Layout Before You Walk In
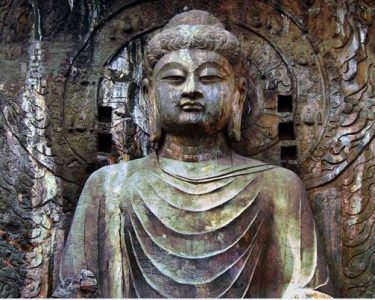
The Longmen Grottoes are carved into two limestone hillsides facing each other across a river. West Hill holds the largest concentration of niches and the site’s best-known large-scale carvings, so it takes longer to walk than East Hill. East Hill is smaller and less crowded, with a more relaxed pace. Between them, the riverbank itself offers the classic photo angle — the cliff face reflected in the water — but only from specific points, not everywhere along the path.
Three physical facts shape your route planning:
- West Hill’s main path runs north to south along the cliff, and it’s mostly one-directional once you’re inside — turning back means walking the same corridor again.
- The river crossing points are limited to a couple of bridges, not a continuous walkway, so timing your crossing matters more than it looks on a map.
- East Hill’s entrance and West Hill’s exit sit on opposite ends of the site, which is why an unplanned route often forces a long walk back to a parking or shuttle point.
The Bank-by-Bank Walking Sequence That Cuts Backtracking
This is the core planning decision for a half-day visit: which bank do you walk first, and where do you cross? The sequence below is built to move in one direction as much as possible, with the river viewpoint placed where it naturally falls along the path rather than as a separate side trip.
- Step 1 — Enter from the West Hill side (south end). Start here because West Hill has the greatest density of carvings and benefits from fresher energy and better morning light for photos. Checkpoint: confirm you’re walking north along the cliff path, not looping back toward the entrance. Common failure: visitors start at the wrong gate and end up walking West Hill from north to south, which puts them at the far bridge too early and forces a longer East Hill walk later.
- Step 2 — Walk the full West Hill corridor north. Keep a steady pace and resist stopping for extended breaks mid-path; there are limited turnback points. Checkpoint: reach the northern end of West Hill roughly at your one-third time mark for the visit. Common failure: overspending time on the first few caves near the entrance, leaving too little time for the rest of West Hill.
- Step 3 — Cross the river at the northern bridge. This crossing point is the one that avoids doubling back, because it lines up with the start of the East Hill path. Checkpoint: pause on the bridge itself for the river viewpoint — this is the widest, clearest angle of the cliff, and it saves you from a separate detour later. Common failure: crossing too early, before finishing West Hill, which forces a return trip across the same bridge.
- Step 4 — Walk East Hill south to north, or north to south depending on where the bridge lands you. East Hill is shorter, so this leg moves faster. Checkpoint: use East Hill’s more open, less crowded feel to slow down slightly, since you’ve already banked time on the crossing. Common failure: rushing East Hill because West Hill ran long, which means missing the hillside’s own carvings entirely.
- Step 5 — Exit near East Hill’s far end and use the riverside path back if time allows. This is optional and only worth it if you have 20–30 minutes of buffer left. Checkpoint: decide before you start this leg, not halfway through — turning back midway is the exact backtracking this sequence is designed to avoid.

| Approach | Backtracking Risk | Best For |
|---|---|---|
| West Hill first, cross north bridge, East Hill second | Low | Half-day visitors with 4–5 hours |
| East Hill first, cross back to West Hill | Higher — West Hill’s longer path forces a second river crossing | Visitors with a full day and no time pressure |
| Zig-zag between both banks for photo stops | Highest | Not recommended for half-day plans |
A Half-Day Time Budget, Stop by Stop
A workable half-day window is roughly four to five hours on site, excluding transport to and from the entrance. Here’s a realistic breakdown for the sequence above:
- West Hill walk: 90–120 minutes, depending on how many caves you stop at closely versus viewing from the path.
- River crossing and viewpoint pause: 10–15 minutes, including photos.
- East Hill walk: 45–60 minutes, since the hillside is shorter and less dense.
- Buffer for rest, water, or a second river viewpoint: 20–30 minutes.
If your total available time drops below four hours, the West Hill walk is the section to compress — skip the outer edges of the path rather than rushing East Hill, since East Hill has fewer alternate stopping points to make up for lost time later.
Common Mistakes That Waste Time at Longmen
- Starting at the wrong entrance. Entering from East Hill first often means a longer, more tiring walk back across the river to see West Hill’s larger carvings.
- Treating the river viewpoint as a separate stop. It sits naturally along the bridge crossing in Step 3 — visiting it separately means walking the same stretch twice.
- Underestimating West Hill’s length. It’s the longer of the two hillsides, and visitors who don’t budget extra time here end up rushing East Hill instead.
- Ignoring midday crowd patterns. Arriving right when the site opens or after early afternoon typically means thinner crowds along the main West Hill corridor, which keeps your pace steady.
A Buyer’s Checklist Before You Finalize Your Half-Day Plan
- Confirm which entrance gate corresponds to West Hill’s southern end — this determines your entire walking direction.
- Decide in advance whether the riverside return path (Step 5) fits your buffer time, so you’re not deciding mid-walk.
- Bring a paper or offline map of the two hillsides — signal along the riverbank can be inconsistent for live map apps.
- Set a hard checkpoint time for finishing West Hill, so East Hill doesn’t get cut short.
When a Half-Day Visit Is Not Enough
The sequence above works well for travelers who want the major carvings on both hillsides plus one clear river viewpoint. It does not work if your goal includes a slower, detailed look at smaller niches scattered along both banks, or if you plan to visit the temple grounds beyond the main hillside paths — those additions typically require a full day rather than four to five hours. Photographers chasing specific light conditions on both banks separately should also plan for a longer visit, since the bank-by-bank sequence above prioritizes efficient coverage over repeated viewpoint visits at different times of day.

If you’re mapping out a Luoyang itinerary around this half-day plan, or need help matching the walking sequence to your group’s pace and available time, reach out for tailored route advice before your trip.